Description
In this writeup, I’m going to be going through my exploitation process with GOAD. This process was through my own investigation. I noticed the Castelblack machine was very insecure. It even had a file upload page when you visited the IP on a browser. I will go into how I exploited this and then gained higher privileges on the machine.
Environments Used
- GOAD
- Kali
Utilities Used
- nmap
- metasploit
- msfvenom
- PrinterSpoofer
- evil-winrm
- sharphound
- bloodhound
- crackmapexec
- Impacket-GetNPUsers
- hashcat
Project Walkthrough
Reconnaissance
When I first started attacking the environment, I scanned the network with nmap. This gave me an idea of the services I would be encountering.
I tried to connect through SMB on all of the machines, but the only one with anything exposed was the Castelblack machine. I figured this was a good starting point. Here is the nmap scan for Castelblack.
|
|
The machine seems to have a web page that can be visited, so I went to the IP in my brower.

I clicked the link, and there was a file upload tool that told you where the files were being uploaded to. This was a clear way to get shell.

Weaponizing
I used msfvenom to craft a .aspx reverse shell. There are a variety of ways this can be done and payloads you can use. Initially, I used just a basic shell and listened for it with netcat. However, metasploit has a multi/handler tool that can be used to spawn meterpreter sessions, which give you a lot more wiggle room.
To craft the exploit for this, you need to do the following msfvenom command:
|
|
The port can be whatever you want, and it’s typically best to avoid 4444 in a real situation as it is typically quickly picked up since it’s the default for metasploit.
Now, once you upload the generated payload to the file upload page, you can visit /uploads/shell.aspx while you have metasploit listening, and you should get a session.
Make sure to do the following commands to get metasploit set up to catch the shell:
|
|
Exploitation
Now you can visit the shell uploaded, and a meterpreter session should spawn after a bit.

The reason I went this route is there is a variety of things you can do with a meterpreter shell. Specifically, it makes it much easier to upload and download files. You can also spawn into a normal shell this way and then back out of it to use meterpreter commands.
From here there are a variety of routes you can take. First, it’s best to elevate privileges. If you check the user you spawn as and their privileges, you will see an interesting one:

You’ll see that you have the SeImpersonatePrivilege enabled. The two attacks that can exploit this are the JuicyPotato and PrinterSpoofer attacks.The JuicyPotato attack won’t work with this machine as it’s a Windows Server 2019 machine, so I went with PrinterSpoofer.
You can do this manually by uploading the PrinterSpoofer64.exe to the box and running the following command:
|
|
This should spawn an elevated shell.
With meterpreter, all you need to do is go back into the meterpreter shell and type getsystem and it will elevate you to nt authority.

From here, you should be able to just type hashdump into the meterpreter window, and all the user hashes should drop:

From here, you can spawn a shell using evil-winrm with the Administrator hash.

Evil-winrm is good in the same way that meterpreter is helpful as it allows you to easily upload and download files. This can be useful when trying to get domain information using SharpHound to exfiltrate the zip that is generated.
I was having trouble doing this through Evil-WinRM, so we’ll move over to meterpreter with the nt authority privileges and attempt to run SharpHound that way.

And from here you can use meterpreter to download the zip file.

BloodHound
One great thing I like using BloodHound for is getting the users in the domain. You can also see what groups they’re a part of and ways you may be able to exploit their privileges.
The author of GOAD has a good tutorial on gathering users other ways, but those did not work for me, so going this route was much easier for me, especially with the Castelblack box being so vulnerable. You can view his walkthrough here.
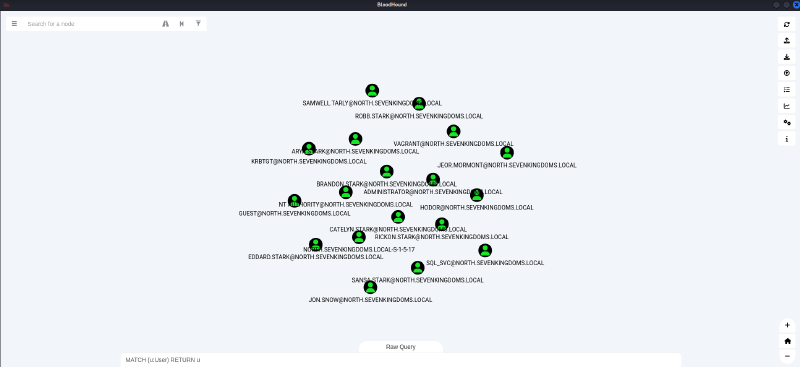
For me, I did the following query in BloodHound to view all the users.
|
|
And this was the result.

From here, you can make a list of users. These we will use to test for credentials. In the GOAD guide, his methods of collecting user credentials were very useful.
Credential Gathering
First, I made a list containing all the users we’ve captured.

You can also click through all the users in BloodHound and look at their privileges. Particularly, sometimes users will leave credentials in their descriptions. We find this with the samwell.tarly user.

We can also check usernames as passwords.
|
|

Another way to get credentials that was suggested in the guide was to use GetNPUsers.
|
|

This command generates a .txt file called ‘aspreroastables.txt’ which you can run through hashcat to try and crack.
|
|

We now should have four credentials:

You can also perform a password spray with the users and passwords you’ve collected, but it looks like the passwords only match up with the people we found them for.
|
|

Sources
- https://blog.compass-security.com/2020/07/make-the-most-out-of-bloodhound/
- https://mayfly277.github.io/posts/GOADv2-pwning-part2/
- https://github.com/itm4n/PrintSpoofer
Conclusion
This was just the first part of my exploration through Active Directory utilizing GOAD. In the coming writeups, I will be exploring getting into the other machines and moving around in the environment further.
Please leave a comment if you have any recommendations on things I could improve, or any thoughts on the process. Thank you for reading!
